how to fix eye bags
Good day fellas. Welcome to today's blog. It is obvious to have eye bags and wrinkles as they are natural. But to look beautiful and stunning we often use cosmetics, skin tightening cream, makeup, etc. especially females. It matters more on photographs as they are memories for a lifetime. Photoshop elements to remove eye bags, dark circles and wrinkles are amazing in perfection. We will learn one easy but useful editing 'how to remove bags under the eyes in Photoshop'. Then we will go for 'how to fix dark circles under eyes'. You can use Clipping Path for making the selection then work on that. We will go step by step in the blog. So, stay with us.
How to fix eye bags?
Before we go for the main editing, we need to keep some matters in mind. Remove eye bags from a photo depends on some conditions. They are,
- Eye bags and wrinkles you should remove so that it maintains the natural look,
- Eye bags concern two matters, dark skin tones, and wrinkles within,
- Bags under eyes editing is different from female to male
- Use your eye to evaluate the proper changes required for the purpose.
We will not remove the background or restore an image but beautify the image subject apparently. That's pretty much it. At the same time, we will learn How Photoshop removes wrinkles under the eyes which are also called Image Retouching. So, without any further I do, let's start.
- Eye Bags removal for female
- Eye Bags removal for male
Female Eye Bags Remove
Let's go for the female as we know, "Ladies first"! I am going to use an image taken from the website called "Pexels". Load the image in Photoshop. I am using Photoshop CC2019 but you can use other versions as well. By the way, the remove eye bags app is available for smartphones but the quality is not close to Photoshop performance.
The Process of Eye Bags Remove
Step 1

First, we will make a copy of the layer by selecting the layer and using Ctrl+J for Win or Command+J for Mac. You can also drag and drop any layer to the 'Create a new layer' icon for the same. I am naming it 'Eye Bags'.

Select the 'Patch Tool'.
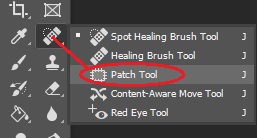
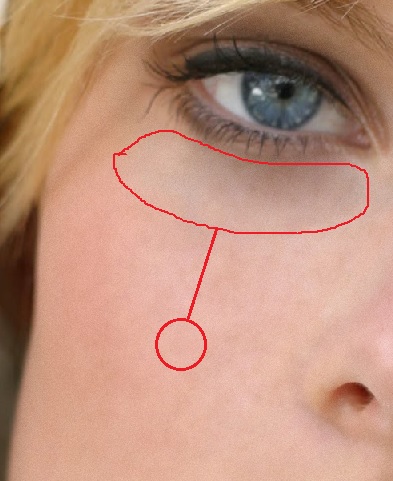
Zoom in to the level so that you can see the impurities more clear. Press and hold Alt key for win or Option key for Mac and scroll up with the mouse scroller to zoom in. Select an area under the eyes.

Drag and drop on the area you want to sample from. Bright areas are good for the process. Keep doing the same to remove all the eye bags. There will be dark shades visible under the eyes and we will take care of them later. The same way goes for the wrinkles near the nose and lips. Try to make a comparatively smaller selection so that the area where we need samples from, contains the same bright tone. Mentionable things are, the patch mode should be 'Normal' and the 'Diffusion' is at '5'. The lower the 'Diffusion' the harder the edges. The maximum value is '7' but the default value '5' is good to use.

Step 2
Now we will handle dark shades. Make a copy of the 'Eye Bags' layer and rename it as you want. And, I am naming it 'Dark shades'.

Select the 'Clone Stamp tool'. Also, make sure the sample selection is 'Current Layer' and blend mode is 'Lighten'.

Take a sample from a light and bright skin tone. To take the sample, you need to press and hold the Alt key for Win or Option for Mac. Take a sample and release the Alt key or Option key. Go to the dark shade areas under the eyes and brush over them. And, make sure not to brush over the eyes or any other places, that could be messy. Keep doing the same until you remove all the dark shades. You can see that the bright color is applied only to the dark tone, not overall. Still, there could be some unnatural bright shades that we will correct in the next step. Also, you can zoom in anytime whenever you want.
Step 3
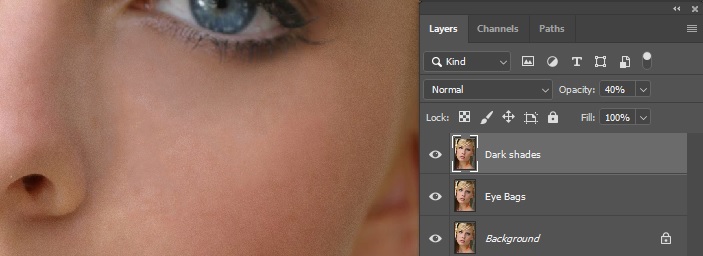
Decrease the opacity slowly to see the changes properly. Opacity '0%' shows the view of the last layer and opacity '100%' will show clone stamp brushing with unnatural effect. So, I am keeping the opacity '40%' for the image. Well, other images may require more or less depending on the size and resolution.
Eye Bags Remove Finishing Touch
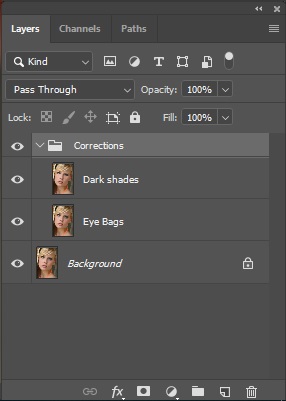
Now I am merging Eye Bags and Dark Shades layer together in a group. Select both layers by using Ctrl for Win or Command form Mac and press Ctrl+G for Win or Command+G for Mac to make a group. You can also group them by right-clicking on both layers when selected and choose 'Group from Layers'. A new window will show and hit 'OK' to make a group. Also, you can rename the group by double-clicking on the 'Group 1'. I am naming it 'Corrections'. Well, it will not affect the procedure whether you rename the layer or not. Also, you can change the opacity in a group. I am using the opacity '65%' for the image. And, I suppose it makes the image look more natural.
We are pretty done here. See the final image below before and after editing.

Male Eye Bags Remove
Now we will go for the male. We will do the same procedure for males but the 'Opacity should be less. The reason is, male faces require a rough look, unlike female faces. If you furnish the male face as female, this could be a mismatch or unnatural. However, there are some male faces that are so flawless and we will count them as an exception.

The Process of Eye Bags Remove
Step 1
First, we will use the 'Patch' tool to replace or replicate eye bags, wrinkles, and moles. For this, we will decrease the opacity not to completely vanish them. The male face is better if you keep them a little bit. Of course, the impurities should be more visible than the female version.

After creating a copy of the background layer for 'Eye Bags' I have used the 'Patch' tool to replicate some areas to reduce eye bags, wrinkles, and moles. Also, I am keeping the opacity at 65% that keeps the rough effect a little bit. Well, you can decrease a little more like 50% or 40% and it is not a big deal.
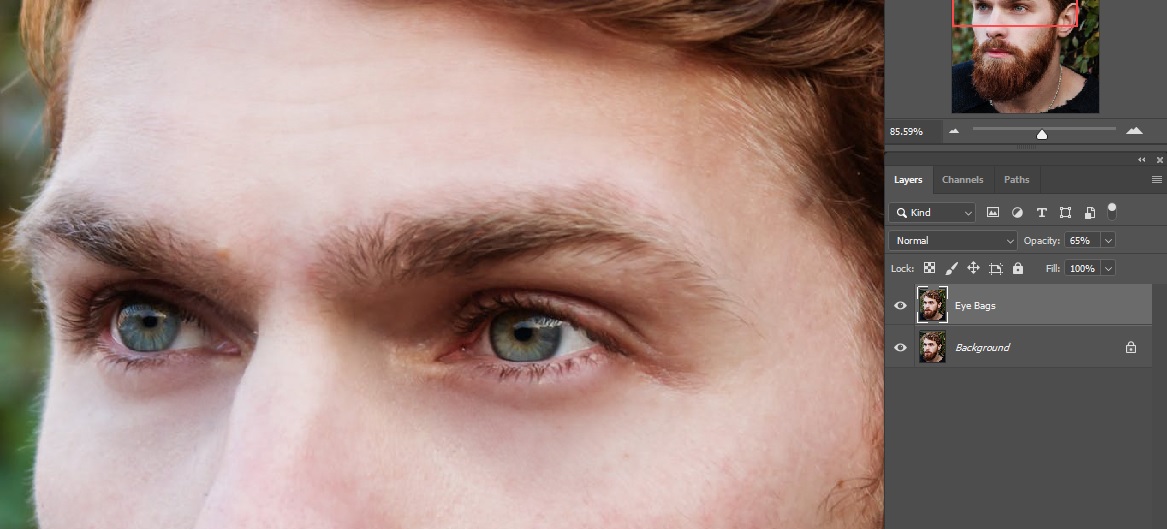
Step 2
Next, we will go for the dark shades. Though there is not much to do we did a little touch on the dark shades.

Step 3 & Finishing Touch
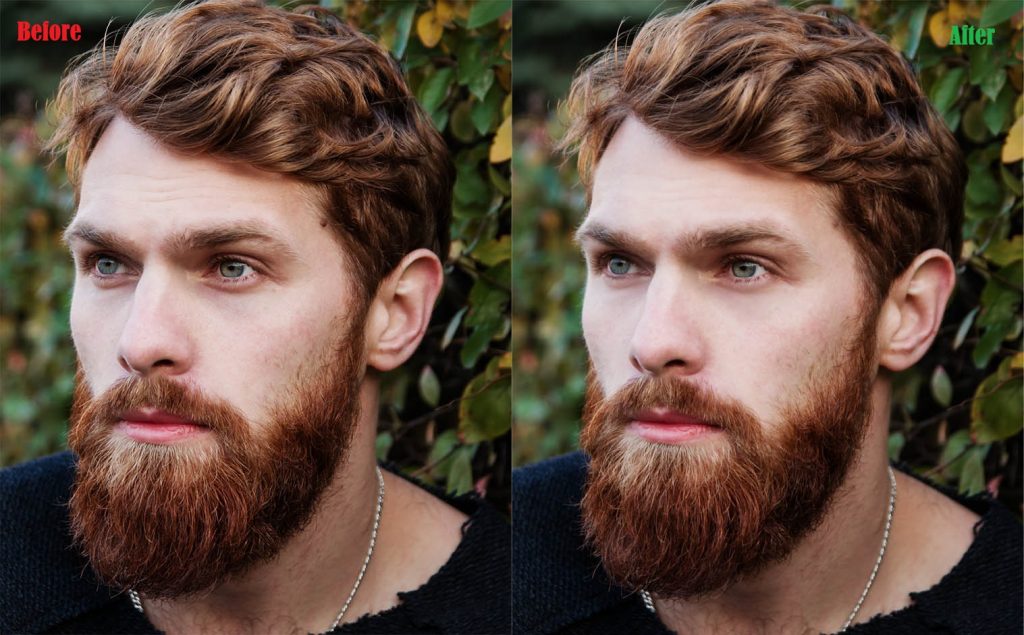
Finally, we will merge 'Eye Bags' and 'Dark Shades' Layers together and decrease the opacity to '25%'. And, this looks pretty much appropriate for the image. Well, other images may require more or less depending on the subject view.

Let's see both the images (before & after) together.
Conclusion
I hope this tutorial helps and if you got to points properly you can remove dark circles in a minute. In here we have also learned how to remove shadow under eyes Photoshop and techniques of Photoshop soften bags under eyes. For more help contact us, 'Clipping World' and we are available for you. Check out our other services on image editing, get a quote and try our free trials.
FAQ
How to remove bags/dark circles under eyes in Photoshop CC?
Ans: You can remove eye bags/dark circles from your image easily with the editing software 'Photoshop'. A couple of techniques you can apply for the editing. but the most convenient one is the 'Patch Tool'. You can use the tool and see the results instantly.
How do I remove wrinkles in Photoshop?
Ans: Wrinkles removal is not much different than the eye bag removal operation. Follow the same procedure and you are all done.
How to remove shadows under eyes in Photoshop?
Ans: The best way to remove shadows under the eyes in Photoshop is by using the Clone Stamp Tool. Select the Blend mode 'Lighten' and take a sample from a bright area. Then brush over the dark area and continue until you are done. Better to reduce the opacity a little to maintain the original form.
How to smooth out under eyes in Photoshop?
Ans: The Patch Tool is good to smooth out under-eye impurities in Photoshop. Just make sure to reduce the opacity a little so that it does not lose the natural look.
How to lighten under-eye bags in Photoshop?
Ans: To lighten under-eye bags only, there are several tools and techniques in Photoshop. The most common and convenient one is using the Clone Stamp Tool with the Blend mode 'Lighten'.
how to fix eye bags
Source: https://www.clippingworld.com/how-to-remove-eye-bags-dark-circles-and-wrinkles-in-photoshop/
Posted by: largecrusuppeas.blogspot.com

0 Response to "how to fix eye bags"
Post a Comment